|
|
|
Code Number: 2B60.10
Demo Title: Hero's Fountain
Condition: Good
Principle: Pressure vs. Water Height
Area of Study: Fluids
Equipment:
Hero's Fountain Demo unit, Large Hero's Fountain using two 5 gallon carboys (Glass), Fluorescein, Black lights, Pseudo Hero's Fountain Demo (Pop Bottle Demo).
Procedure:
See Also: 8B40.60 - Galactic Jets in the Astronomy section.
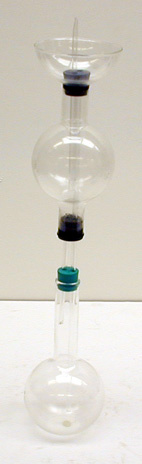
Demo Unit: Fill the top flask with water by sucking on the tapered tube while holding the short tube on the other end of the flask under water. Holding a finger over the tapered tube so that the water does not escape, insert the upper assembly into the lower flask. Fill the cup on the top with water. Remove the finger and water should start to spout due to a compression of air in the lower flask.
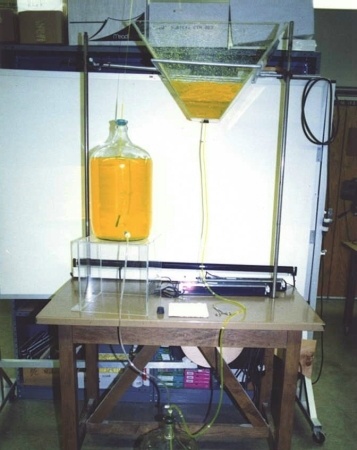
The large fountain is exactly the same as the small unit except that the glass tubes are connected with hoses so that a larger separation of the reservoirs can be produced. This in turn gives a greater internal pressure buildup and a greater water stream height. Fluorescein is added to the water for this demo and when used in the 8B40.60 Astronomy demo so that black lights may be used to illuminate this demo for a greater effect. NOTE Take great care with the carboys when filled with water as this makes them super fragile to bumps and scratches. The procedure for this demo is: This is a fun demo, but it can get real messy real fast if done wrong so beware (see the "fail" movie below). First, place the funnel into the aluminum cradle as shown. To make sure the large funnel does not leak, press the stopper in loosely from the inside of the funnel, and then insert the glass tubing part that is connected to the longer hose. Once that is done, twist and press the stopper into the funnel to insure a seal. The top carboy will be the one with a hole in the side near the bottom. Insert and twist into the side hole the short hose off the stopper with the two hoses connected to it. Make sure you have this firmly in place as pressure will be building up in this carboy. The stopper with the two hoses coming to it is the one that will be inserted into the other carboy.
Several containers of fluorescein dyed water are on the shelf in the Oscillations 3D40 section. Once you have pre-arranged all the apparatus, fill the top carboy, (the one with the side hole near the bottom), nearly full with the fluorescein dyed water and then set this onto the Plexiglas cube as shown. You will need to clamp off the hose coming out the bottom of that carboy with a hemostat before filling. Then insert the stopper with the short hose and the "jet" nozzle into this carboy. It will help to press this into place with a screwdriver so that it will not pop out when the carboy is pressurized. Insert the stopper with the two hoses going to it into the bottom carboy and press this into place with the screwdriver also as pressure will build up into this one also. Then, use a hemostat to clamp off the hose coming from the funnel into the bottom carboy. Put at least two gallons of water into the funnel. When you are ready to do this demo, you will put a towel down on the floor and then set the bottom carboy onto the towel which will help ensure that nothing on the floor will break the carboy during the demo. Remove the two hemostats and allow the liquid from the funnel and the top carboy to flow into the bottom carboy. This will then build up the pressure in both carboys. Once the pressure is built up sufficiently, either liquid will stop flowing into the bottom carboy, or if you don't have enough liquid in the funnel, the air will try to blow up into the funnel. If it starts to blow up into the funnel, clamp it off immediately with the hemostat before all the pressure in the system is lost. Once you have built up the pressure in the system sufficiently, you should be able to remove the stopper on the "jet" nozzle, and the stream of water should shoot up high enough to flow back into the funnel. You may have to angle the "jet" to ensure that it angles the stream into the funnel. You can also enhance the demo using black lights as the fluorescein dyed water is black light sensitive. Make sure you clamp off the hoses before you put everything back onto the table when you are done with the demo.
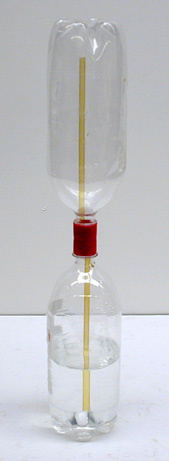
The pseudo Hero's Fountain demo has made some obvious sacrifices for the sake of reversibility. There are only two reservoirs instead of three. The fountain also is not a continuous stream in this demo but rather an intermittent spurt.
References:
- Thomas B. Greenslade Jr., "Apparatus Named After Our Academic Ancestors - VII", TPT, Vol. 62, #8, Nov. 2024, p. 636.
- P. P. Ong, "Hero's Fountain: Reversible Model", TPT, Vol. 30, # 7, Oct. 1992, p. 436.
- Virgil E. Stubblefield, "Hero's Fountain: Quick and Squirty", TPT, Vol. 30, # 7, Oct. 1992, p. 437.
- Jeff Brooks III, "The Air-Ram Jet Pump- An Improved Hero's Fountain", TPT, Vol. 21, # 5, May 1983, p. 318.
- Thomas B. Greenslade, Jr., "Hero's Fountain", TPT, Vol. 20, # 3, Mar. 1982, p. 170.
- Fc- 2: Freier and Anderson, A Demonstration Handbook for Physics.
- Borislaw Bilash II, David Maiullo, "How's You Do That?", A Demo a Day: A Year of Physics Demonstrations, p. 10.
- 212: "Hero's Fountain", On Gases, Unknown Reference.
- Y. Perelman, "Modification of Heron's Fountain", Physics Can be Fun, p. 300 - 303.
- Tik L. Liem, "Turn A Little Water Into A Lot Of Lemonade", Invitations to Science Inquiry - Supplement to 1st and 2nd Ed. p. 27.
- Joseph Frick, "#106 - Hiero's Fountain", Physical Technics: Or, Practical Instructions for Making Experiments in Physics and the Construction of Physical Apparatus with the Most Limited Means", p. 127.
- The Queen Catalogues Vol. II, Catalogue of Physical Instruments, No. 4200, p. 23.